Sunday, October 13, 2013

Second verse, same as the first

This entry actually covers yesterday and today.  I'll keep the chatter to a minimum  on this one since most of what I did is a repeat or continuation of what I've already done.

These are the hammer dollies I'm going to be using to get the lumps out, or at least under control.  I got a great deal on all three in an eBay auction ($20 shipped).
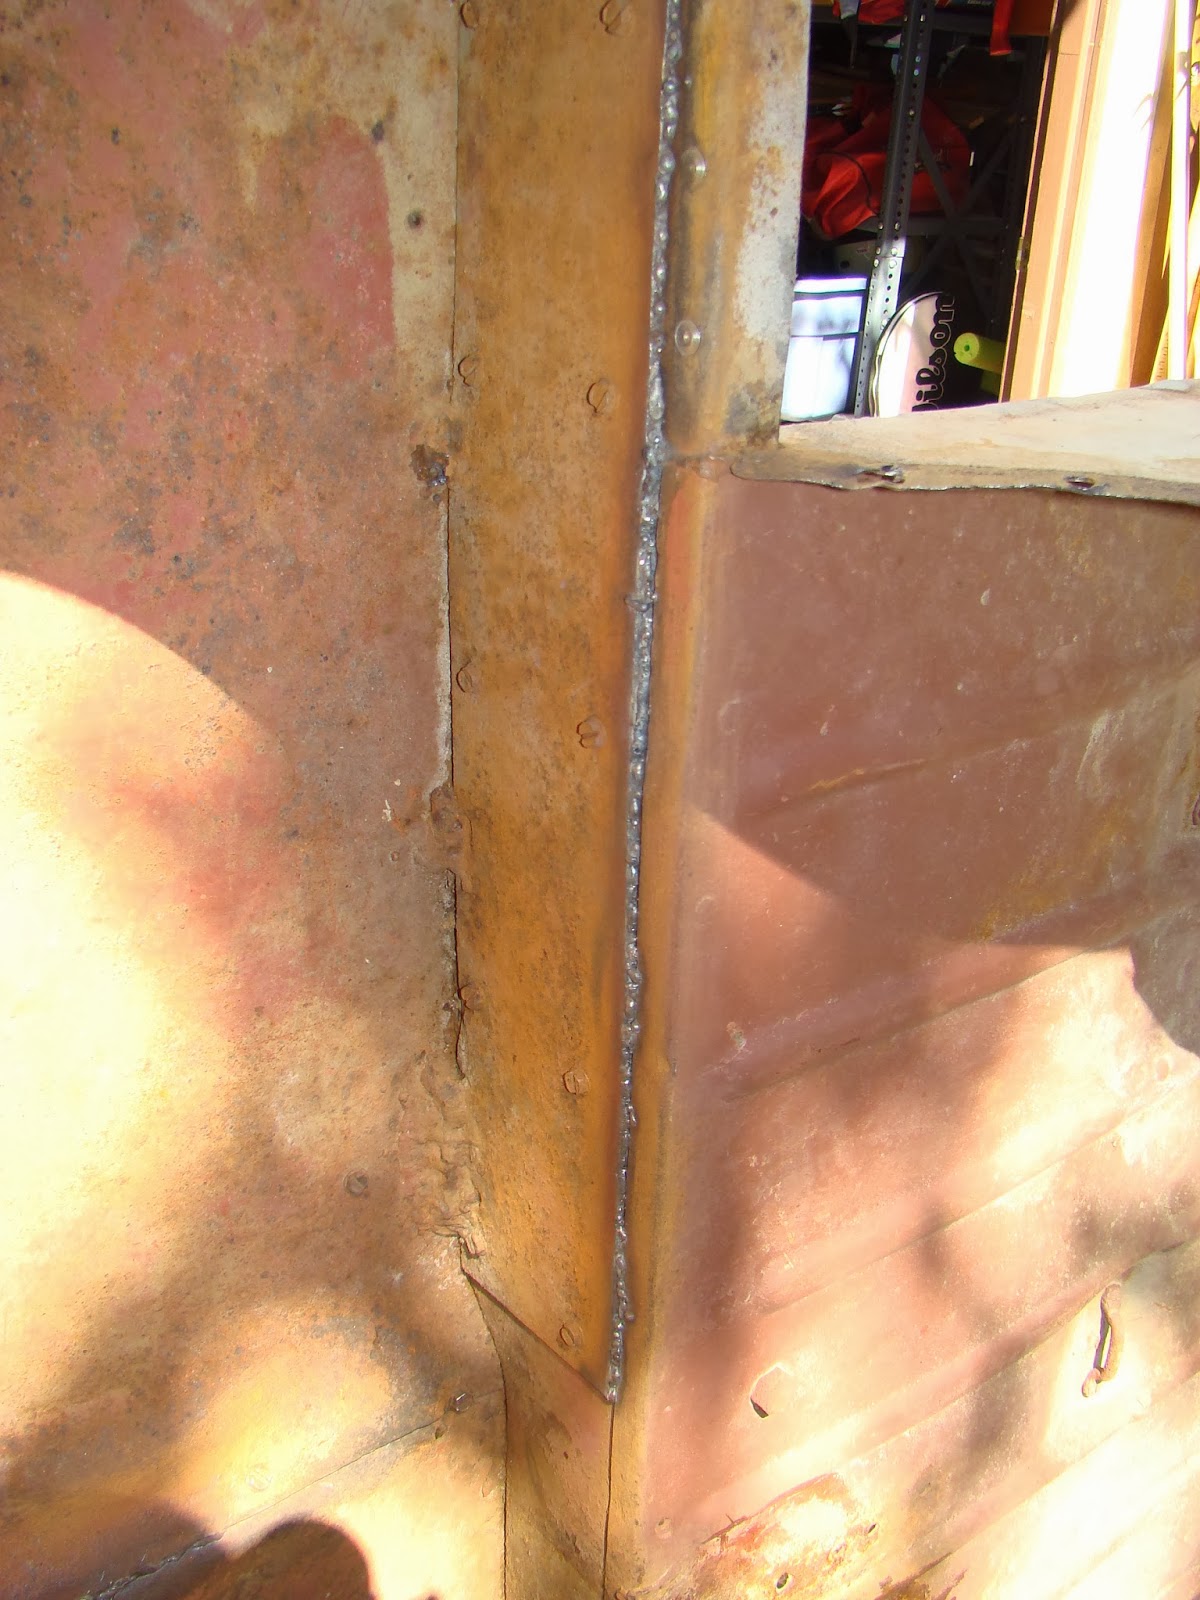
I used these to help the patch panel fit its opening better.  Then I started the welding.  It was originally held in with spot welds, but I was determined to go to town with the Lincoln to get it all nice and tight.  I know some of these look quite ugly, but remember that I'll be grinding down my booger welds later in the build.
Welding around the channel bracket was not terribly challenging. It was just a matter of filling the random holes and tracing the edges.
From the back, you can see that I got good heat penetration welding the bracket to the patch panel.  I was happy to notice this.  Note also that I welded the back side as well as the front.  This piece isn't going anywhere.

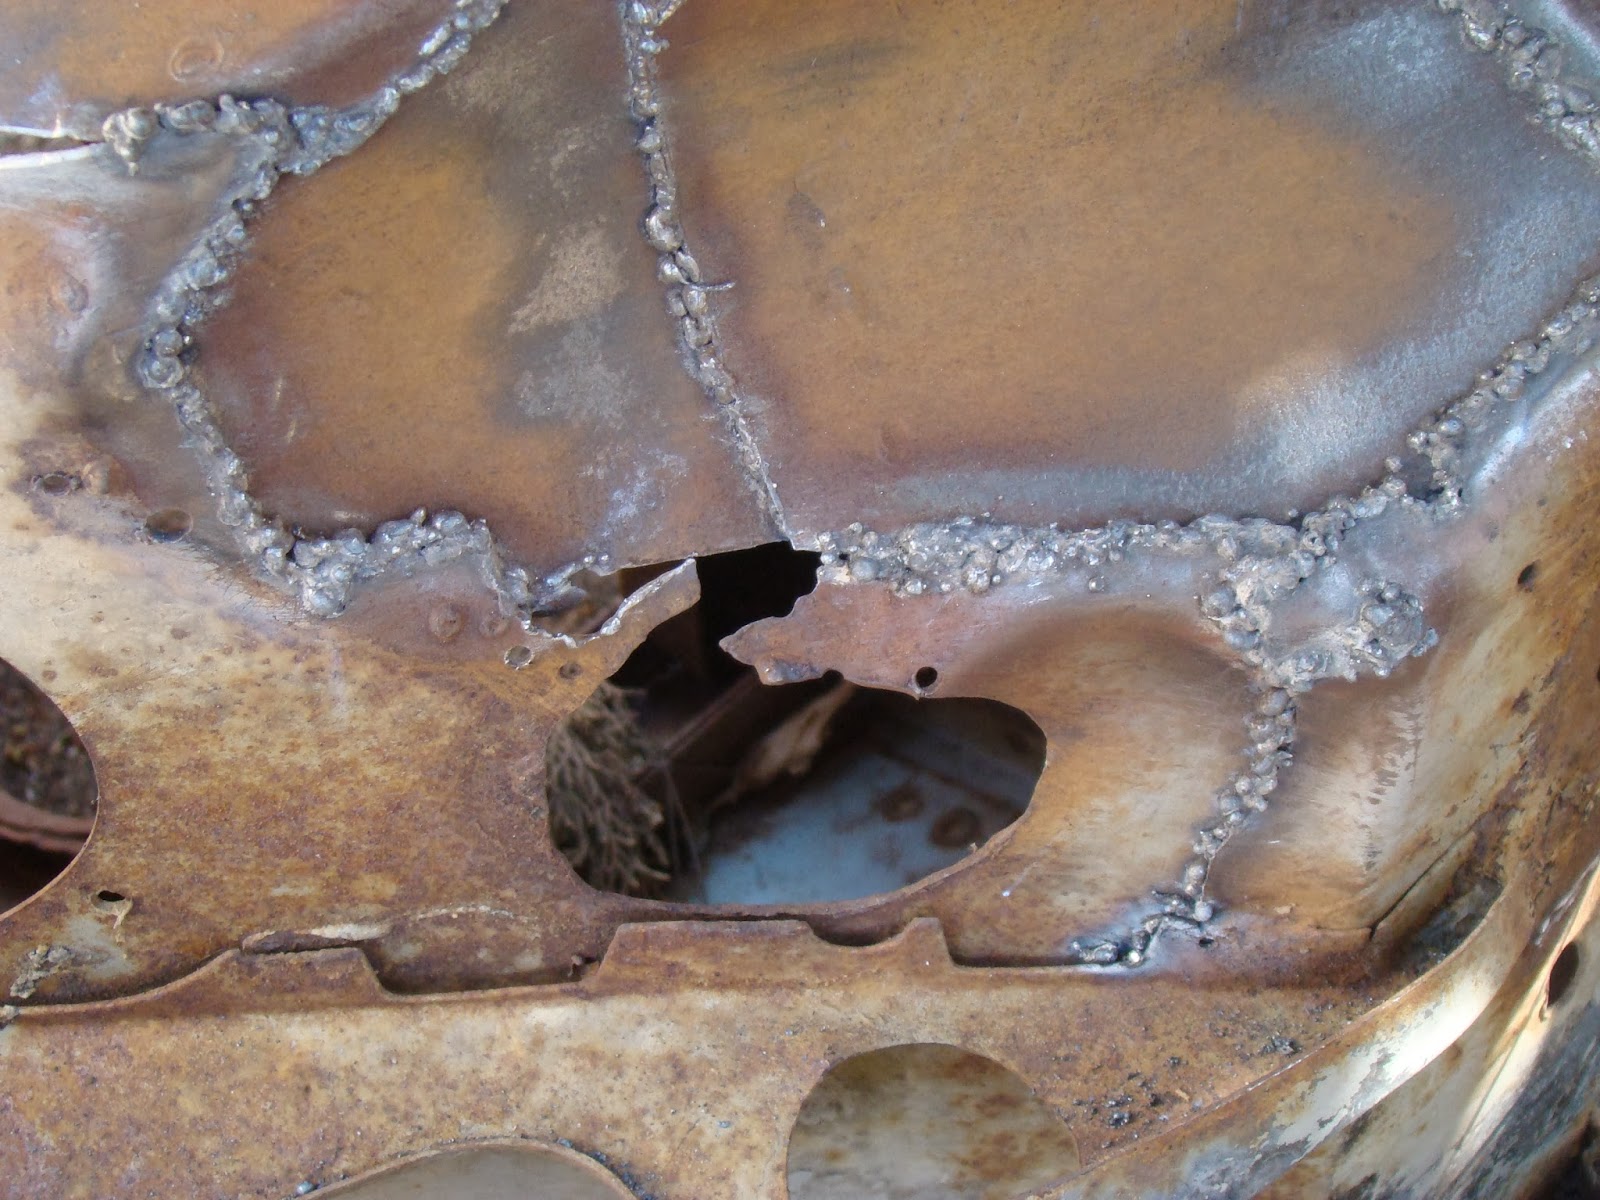
Then I turned my attention to the toolbox I removed from the 2A tub.  It wasn't in bad shape at all compared to the floor it covered in the 2A tub.  And since a replacement box is over two hundred dollars, I wanted this one to work out.  Besides, I like to keep as much original-era stuff on the Willys as I can. This is what I started with.  The vast majority of the box is solid, just scaly surface rust covering it all.  In the lower right you can see a somewhat-rotted hat channel, but I'm not going to spend time welding in anything since the piece is still structurally sound.
Using the wire brush cup attachment on the grinder, I took about ten minutes to get it to look like this.
Much cleaner, right?  If you look closely, you can see the backside of the embossed cursive Jeep script in the front wall of the box.  I love little features like that, even though it's going to be largely invisible behind the passenger's heels.  I'll know it's there.

Once the POR-15 treatment was done, this is what I ended up with.  As part of the process, I poured some down the hat channels, hoping to help contain the rust.  This rig will be housed inside and not driven in the rain (since there won't be a hard top), so I'm not worried about future rust.

I also spent some time removing the ugly panel behind the driver's seat, just like the one I removed and replaced on the passenger side.  Not much to add to what I did before.  I was bit better at it this time, not wasting time taking out the bolts.  Gotta love the air chisel.  I also used a small sledge hammer to beat the panel out of its opening once the spot welds and seams were severed.

That panel really is ugly, isn't it?  I can't imagine it looked much better before the surface rust.

Well, that's all for now.  Quite a productive weekend, and just so much fun.  My brain just doesn't have room for this and school business at the same time, which is awesome.

Friday, October 11, 2013

Working on the undercarriage and repairing the fender well

A bit of a long day today, but I really made big strides in getting the undercarriage in better shape.

I started small.  The hood's hinge is cracked and in need of a few inches of welding.
A blurry shot, but you get the idea.  I'll post a better one later.  The weld is obviously thicker than I need, but I'll grind it down later.  Lots of my grinding work is being put off so that I can do it in the garage with the doors closed so as not to annoy my neighbors with what has got to be the loudest tool/attachment combo I've ever used.  In the past, I was conscious of any router activity I did while woodworking.  Not anymore.
As I've said before, what is rotted on one tub is in good shape on the other.  In the pic below, I've already removed the hat channel that runs out under that triangular firewall/chassis bracket, which is bent and has been hacked on a bit.
The donor tub brackets have a protective coat of paint, and they are considerably more "true" in their cutouts and lines.
I cut both of them off.  Here they are side by side for comparison.  Fortunately, this is one of the areas where the 2A and 3A tubs are similar enough to allow for interchange.
I prepped the area on the 3A tub for the "new" bracket.  I made a few tears in the firewall sheet metal, but nothing I can't repair.  The air chisel sometimes can't distinguish between what needs to go away and what needs to stay.
With the bend in the top of the triangular bracket, it was easy to locate its mounting spot.  I tacked it in place (no pics) and then proceeded to getting the hat channel cut and shaped for install.  Rather than buy authentic repopped channels ($$), I spent about ten bucks on six feet of 1"x2" .120" wall DOM tubing.
Mock up.  It's a little thicker than the original hat channels, which is fine.  I'm a fan of beefier replacement parts.  I hammered the end that meets up with the remaining hat channel so that they will line up for welding.
Welded in and ready to go.  I can lift the entire body from this one area, so I'm confident in my welding.  (In fact, each day I'm getting more confident that I know what I'm doing, but I've been tricked by my other Jeep into erroneously thinking that same thought, so we'll see.)  The green paint is self-etching primer, which is what you want to use against bare metal.
Up next today was the underside of the passenger flooring.  Recall that I'd already removed the hat channels.  So now I needed to start cutting out the cancerous sheet metal to see what can remain. I've used a sharpie to mark out where the 1"x2" tubing will go.
I knew that I wanted most of the original floor panel gone.  It was thin, rotted, and Swiss cheesed.  Here's the initial excision.  On the right side of the pic is healthy flooring, a good chunk of which is not underneath the 1/8" added-in flooring.   
Once I started cutting into it, I found a little surprise.  If you look in the closeup pic below, there a build up of what looks like rusty mud just above the hat channel opening.  That's the rust dust of the original floor and hat channels.
It took a while, but I was able to vacuum out the bulk of it.  Unfortunately, some of it still sits in the gap between the new and old floor where the tranny hump rests.  I scraped out what I could and mixed in some POR-15 to help convert it.  I also coated the rest of the exposed usable floor with the same.  

Remember this hole behind the passenger seat?  It was time for me to start making a repair panel.
I started with a 2'x5' sheet of 16 gauge mild steel.  As I was buying it, I had the feeling it was thicker and heavier than the original sheet metal, but I was willing to err in that direct rather than its opposite.  I cut a piece that was oversized by at least an inch in both directs.  I had some black scrap L-bracket steel that I put underneath my bend line (you can see it peeking out by the upper clamp).  It helped keep my bends fairly crisp.
I used a piece of coat-hanger wire to get an approximation of the bend I would need to match the opening in the 3A tub.
This is a better shot of the L-brackets I'm using.  You can see below how I'm getting the edges to bend over.  These lips will be my attachment flanges.  The next few pics don't really need explanation.
Getting it in place with that channel bracket still there was quite tricky.  You can see the holes I've punched into the bracket to provide me more opportunities for welding.
Once I got it in, I realized (not surprisingly) that my panel was a little too long; its width was fine.  I was not willing to remove it for fear of damaging it, so I knew I'd just make the top and bottom flanges a wee bit larger.
The back side.  Not too shabby.  It does, however, present a nice contrast between it and the scaly/messy original sheet metal.
That was enough for today.  I wasn't ready finalize it.  That'll be tomorrow's or Sunday's task.  For now, it's in, it works, and I'm pleased.

Sunday, October 6, 2013

Removing rot and welding the passenger side floor

After getting comfortable with the welder on the firewall, I turned my attention to the right rear quarter panel, which is suffering from a bit of rot.

This first one is above the right wheel well.  I started by sanding the area around the hole to determine how far out the rot extended.  It's actually not too bad.  Clearly, enough rain dumped down and got caught in that support bracket without having a place to go.
I used compressed air and a vacuum cleaner to get the dirt and rust powder out of there.  I also picked at it with a screwdriver to break free any chunks.  I have Permatex Rust Treatment (POR-15) that converts the rust into a black polymer that functions like a primer.
Once it's set up and ready, I'll clean up the edges of the hole I've made and weld in a patch panel.  It'll probably be in a month since it's somewhat low priority.

Here are the two other major areas of rot on the back right corner.  The big one is obvious, but the more insidious one in the picture below--and which will take more work to repair--is the jagged crack on the right above the two dime-sized holes and below the main seam.  Behind that is a support bracket that isn't really doing it's job anymore.
I wasn't sure what to make of the big gash, at first.  I couldn't figure out what that fibrous stuff was.  Given the original owner's love of bondo, I thought it might've been some kind of 1970s filler product that just didn't hold up.

I was wrong.  It's wood, used to keep the hat channel here from collapsing under pressure.  Of course, the wood soaks up water and encourages cancer.  That is, without question, the biggest failure of design the original Willys folk made.  Their hat channels just didn't have a fighting chance.

First step to get the largest issue under control is, like the little one above the wheel well, to get a sense of where the rot stops and good sheet metal starts.  For this process, I'm anything but subtle.  I just start prying metal out of the way.  The original 18 gauge, if it's solid, doesn't bend easily, nor does it puncture easily with a body hammer's spike.  Here you can see both holes getting pried open to find their edges.
I used the cutoff wheel to start delimiting the hole.  There's a better shot of the wood in the channel, too.  I'm pleased to report that the hat channel is secure as it moves forward towards the wheel well opening.  That way I don't have to worry about removing the entire bracket and reattaching it.
Here's an undershot of the leading edge of the channel.  That wood chunk is about to make my life tough.  It was quite a pain to get out because I didn't know there was a nifty little nail going through the metal and into the block, holding it in place.  Why could the nail have rusted out along with the back corner?  The rest of that surface rust/scale will be gone at some point.  I've got this great attachment for my grinder, a wire brush cup, that will make quick work of this.  Plus the POR-15 rust converter.  By the time I'm done with the body work, rust will be insignificant, though realistically not gone for good.
Just about done.  All that's left is that stupid block of wood.
Out!  See all the sawdust?  I had to start drilling holes in the wood. Again, if only I'd known about that little nail.
With the sawdust gone, I can finally get a good feel for the condition the channel is in.  Time to grind.
Five minutes of grinder and sanding, and I'm pleased with the condition of the channel.  It's still plenty thick and solid, so there's no need to replace it.
Note the black tint to the channel.  You can also see in the lower right the cuts I've made to that smaller crack.  The bracket behind is all but dislodged from sheet metal, so I'm not sure what to do about it right now.
My guess is that I'll drill some small holes in the outer sheet metal, clamp the bracket back in place, and then weld through those holes to attach the bracket to new metal.  That basically recreates the stock spot welds.  We'll see.  I'm confident it'll come out fine, and I'll do something similar to the sheet metal I'm going to use to patch over the larger hat channel.

I also wanted to get the passenger side floor secured.  For some reason, the original owner booger welded AND bolted it in place, and he did it over the original floor.  As I mentioned earlier, he also removed the original toolbox from under the passenger seat, which I want to put back.  All that adds up to work for me, but at least the floor he installed is 1/8" thick and rot-free.

This shot is of the front/leading edge of the new floor.  You're looking at where the passenger's feet will go.
 Here I've welded around the transmission/transfer case hump.
 This is the back edge and wall of the toolbox.  That hole you can see through is where one of those weird bench seat pipe panels was.
 This is preliminary welding.  I'll make it as secure as I can, and then I'm going to go back and grind down some of those monstrous welds (that look like piles of caked on mud) in the picture above.  There are at least four such junk piles.  I'm thinking he was stick welding, which is an inexact--less refined--form of welding.  His welds make my boogers look good.


Friday, October 4, 2013

Firewall refinement

The 3A tub firewall was crudely clearanced for the Ford V8, which is fine, but I'm not impressed with how the various individual panels overlap.  Lots of jagged edges and clumsiness.  To get me some more practice at welding, I decided to neaten things up a bit and add to the tub's overall integrity.
The gaps in the overlapping panels are not acceptable, so as you can see in the pic below, I'm trying to trim the excess to get some butt-weld opportunities.
Cut off a little more than I should have here.  I'll splice in a patch strip.
Booger welds galore.
 Trying my best to fill in those gaps.  They're getting a bit excessive, but I'm okay with that.
Here's my effort at seam repair.
Just about done.  Not looking to shabby, I must say.
And now I have to grind away for an hour or two.