Tuesday, December 31, 2013

Transmission installed

I propped the transmission up on the bell housing (being careful not to have the input shaft hit anything or have pressure put upon it) so that I could install this mounting plate.
Here's the transmission mount that allows for some vibration in the drive train.  Yes, it's the one that came on the Willys when I bought it.  But it's in good shape, with minimal degradation of the rubber, and a replacement is about fifty bucks, so I'm going to run with this.  
To get the tranny back in, I finally broke down and dropped the crossmember, which made installation a cake walk.
While it was off, I ground the mounting flanges clean and painted them up.  While I was doing so, I was also playing lacrosse in the front yard with my two younger kids, so I didn't bother to get pics of the painted up ends.  Just imagine them shiny black.
With a bit of wiggling, I got the input shaft inserted into the clutch disc, and then I bolted up the bell housing.  I'll torque them to spec tomorrow.
Coming at the transmission mount from underneath, I had no difficulty getting the mount bolted to the crossmember and then the crossmember bolted to the chassis.
Note how the bearing and the end cap are sitting nice and flush against the T90 case.
RTV and a gasket in place.  I had to trimmed the gasket just a bit (about 1/16" or so) where it met up with the rectangular locking plate that keeps the two shafts from spinning.
Transfer case slip-fitted in place.  Bolts to come shortly.
Bolted up, and the T90 covered to keep crud out.  I won't bolt the shifter into place until after the Warn is on and the front and rear yokes are torqued to spec (100 ft/lbs.).
Here's the transfer case mount.  If you'll observe, the brass washer is slightly offset from the transfer case hole, but a bit of finagling got them lined up.
It wasn't necessary, but I felt the need to grind down a Grade 8 washer to fit into the casting and help distribute the clamping load of the bolt.  I've heard of the case snapping at this spot under extreme load, so hopefully this will lessen the chance of that occurring.

Friday, December 27, 2013

More prepping, plus clutch replacement, Warn overdrive refurb, and tire hacking

Continuing my pattern of having to do a few different tasks multiple times, I began this day with the removal of the bell housing.


 I discovered that the stock clutch and pressure plate I ordered to go with the 260 didn't work with the input shaft of the transmission.  The center gear bore of the clutch disc was too small (1 1/16" instead of 1 1/8" in diameter), so I had to get a different disc.  Unfortunately, no one makes a 10" disc with a ten-spine 1 1/8" center gear, but after a bit of digging, I found a 9 1/4" Centerforce clutch disc.
The stock clutch on the right, the replacement on the left.  Obvious size difference.
Here they are overlapped.  Centerforce is a good aftermarket brand, so I'm not concerned about the diminishment in size, especially since the new one is supposed to work on a late sixties Camaro (granted, with a six cylinder).  I also like that the new one has size anti-chatter springs.
Installed.
Finally, I have the right sequence.  The adapter and the bell housing go on the T90 first.  That way the release bearing will not fall off on installation.

A few refurbishments were in order.  Here's the mounting plate that sits under the T90 and above the rubber transmission mount.
Cleaned up.
And painted.
Waiting to meet the V8.

To kill a bit of time, I turned to the Warn overdrive unit.  Again, mostly aluminum here so no rust, but the grime and scaling still need attention.
A very old gasket.
Ready for some gentle scrubbing.
Scrubbed.
When I was working on removing the Warn, I pulled the cotter pin, but it was so shot that it broke.  Here's the new one in its proper place.
The rear cap installed and sealed up nicely.
The case itself needs some scrubbing.
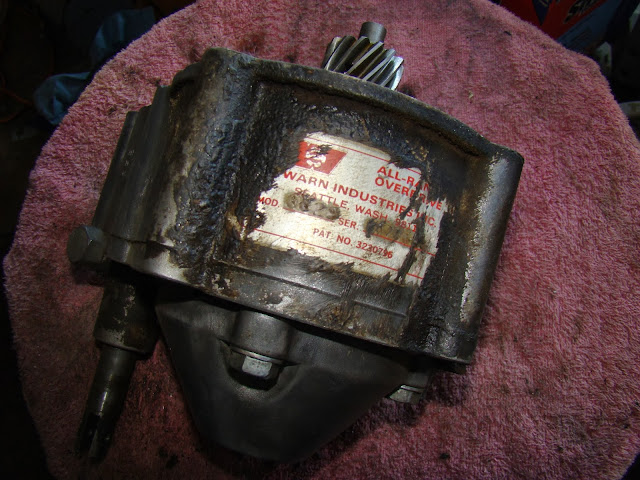
Under all the crud, I found this, which delighted me.

Here's the rubber transmission mount.  It was equally grimy, so I worked it over and prepped it for paint.


This was a completely different task, one which I did after the kids went to bed. I needed to get an accurate measurement of the rims the Willys came with so that I could buy the right one (preferably used) for my spare--a must for an off-road vehicle.  Since this tire, the back left, was extremely flat and no longer doing its job, I jacked up the rear axle, put a jack stand under the left side, and pulled this thing.
I do like my Sawzall.  Time for the tire to come off.
First a wedge cut to gain access to the bead.  As I was doing this, I was having flashbacks to when I had to cut a tire off a rim to make an art project while I was at the University of Illinois Champaign-Urbana as an art major.  The assignment was to make a musical instrument, so I turned a rim into a snare drum with four springs in an X pattern and tissue paper over the top to function as a drum head (each layer held in place with thinned Elmer's Glue).  My professor, to test the strength of the drum head, beat the hell out of it.  I'm proud to say it worked well and sounded good.
When my son saw this, he giggled.
 It took a while, but I finally got through the bead cable.

Update: found a rim on eBay, seventy bucks delivered, which is a great deal.  The "new" one is on the right.  Of course, it's only new to me.  Apparently it's from a 30s or 40s Ford, which I like since the Willys is already part Ford.  I has the same dimensions (15"x8") and lug pattern (5x5.5") and backspacing (4").

Friday, December 20, 2013

Prepping for T90/Dana 18 installation

While the tranny and transfer case were out, I wanted to spruce up the cross member, getting rid of any grime and surface rust.  Here's the before shot.
After a good scrubbing and wipe down with acetone.
Painted with VHT enamel.

This is the thin guard that keeps road grime and dust off the flywheel and clutch.  Judging by its level of crud, it seems to be doing its job.
Half and half.
All sparkly.
Painted.
The aluminum adapter had no rust (of course), but it had some minor surface corrosion and paint overspray.
Cleaned up.  Just like with the bell housing, I used a smaller wire brush in my variable speed drill to scrub it clean.  I didn't want to damage anything. (On a side note, I'm curious if the Teco company is still in Fresno and if the folks there would know anything about the year this adapter was made.  I'm hopeful that I can narrow down when the Ford 260 was dropped into the Willys.)
Installed on the transmission.  Unfortunately, this isn't the correct sequence for the install, so it'll be coming off soon.
The clutch fork boot ordered from Wild Horses 4x4 in Stockton, California.  This was designed to go on a Ford V8 found in early Broncos.  I couldn't find one for cheap enough that was guaranteed to work with my 260, but this would work with a 289 or 302.  I gambled that Ford wouldn't have made a different boot for its different V8s.  I was, fortunately, right.
Look at how crusty the old one was.  Note, as well, that the bulk of the boot is missing.  It wouldn't exactly keep out the dust.  The new one will.
Installed.  Of course, it's upside down.
The spring installed on the back of the shift fork.
Installed correctly.
The pilot bearing installed.
My youngest helping me install the bell housing.  She knows her way around tools, which is awesome.
A peek inside.